Network Proxy Config
Linux
Clash
使用LDAP账号登录网站

进入后在订阅链接中选择 Clash

然后点击复制

下载 Clash Core for linux
https://github.com/Dreamacro/clash/releases
解压后放到一个目录下,例如放到 /opt/clash 里,将可执行文件更名为 clash
测试能否启动
1 | # ./clash -d . |
出现 proxy listenning at 则可以认为启动成功.
下载GEOIP数据库,将其放到clash可执行文件的同级目录下,命名为 Country.mmdb
cdn.233xyx.com
下载刚才从网站中复制的Clash链接
1 | wget http://airport.xxx.com/s/xxxx?target=clash -O config.yaml |
此时,/opt/clash 下的目录结构应该为

创建 Clash service
/lib/systemd/system/clash.service
1 | [Unit] |
启动服务
1 | systemctl start clash.service |
在Shell中设置
1 | # set clash network proxy for all user |
在桌面环境中设置
手动设置系统代理

后续管理
更新订阅(公司内网环境下)
1 | cd /opt/clash |
节点管理
打开 Clash 的一个网页管理面板(纯前端面板,部署到本地也是同样的效果)
yacd - Yet Another Clash DashboardYet Another Clash Dashboardhttps://yacd.haishan.me/
接口选择为

然后就可以进入管理了

Clash 导入自建vmess节点
如果你是自建服务器,点击 https://v2xtls.org/clash_template2.yaml 下载模板配置文件,用记事本、VS Code、Notepad++等编辑器打开,找到v2ray配置块,把 server、port、uid等信息改成你服务端配置(不知道这些信息填什么请参考参考查看 获取科学上网服务端信息):
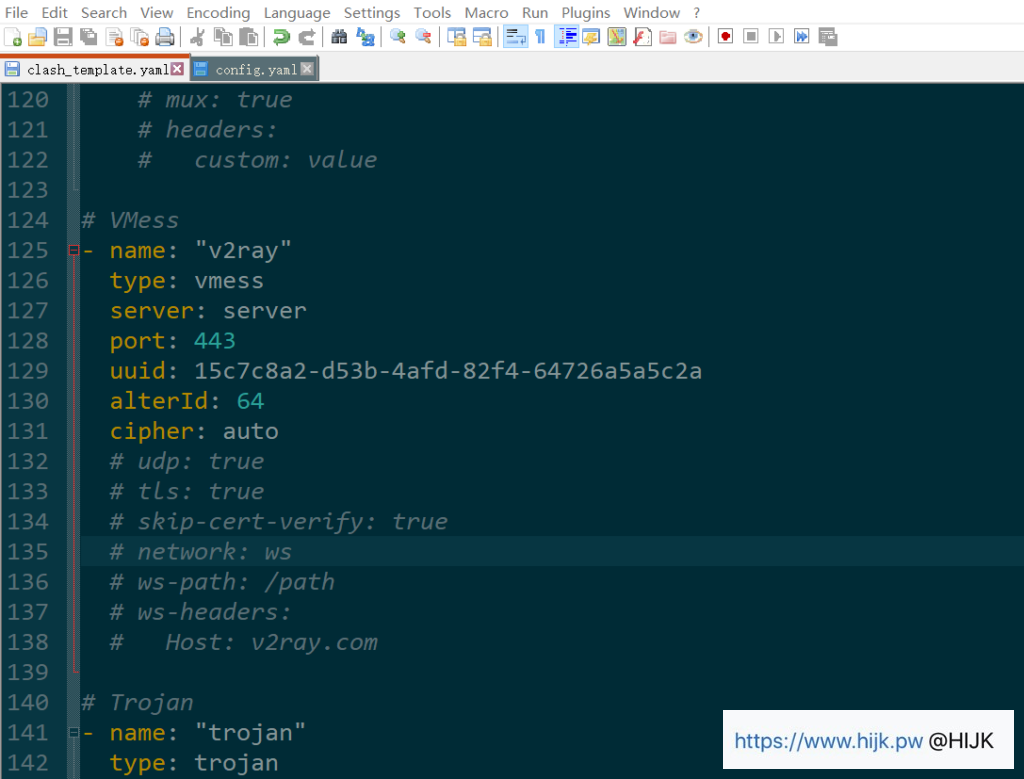
clash配置v2ray信息
如果使用了伪装,把tls、network等字段的注释取消(把#号和后面的空格删了),并正确配置伪装路径和伪装域名。
注意:
\1. 如果看不懂配置文件,不要改name的值!
\2. 如果有多个节点,按照v2ray格式修改ss/ss-obfs/trojan等节点的信息,看不懂不要改name的值!
\3. 修改name的值、添加和删除节点请参考:深入理解Clash配置文件
\6. 点击“Profiles”,把修改好的配置文件拖到clash界面中,然后双击选中拖进来的配置文件(深色表示选中):

clash导入修改好的配置文件
\7. 接着点击“Proxies”,进入最重要的设置:选择代理模式和使用的节点:
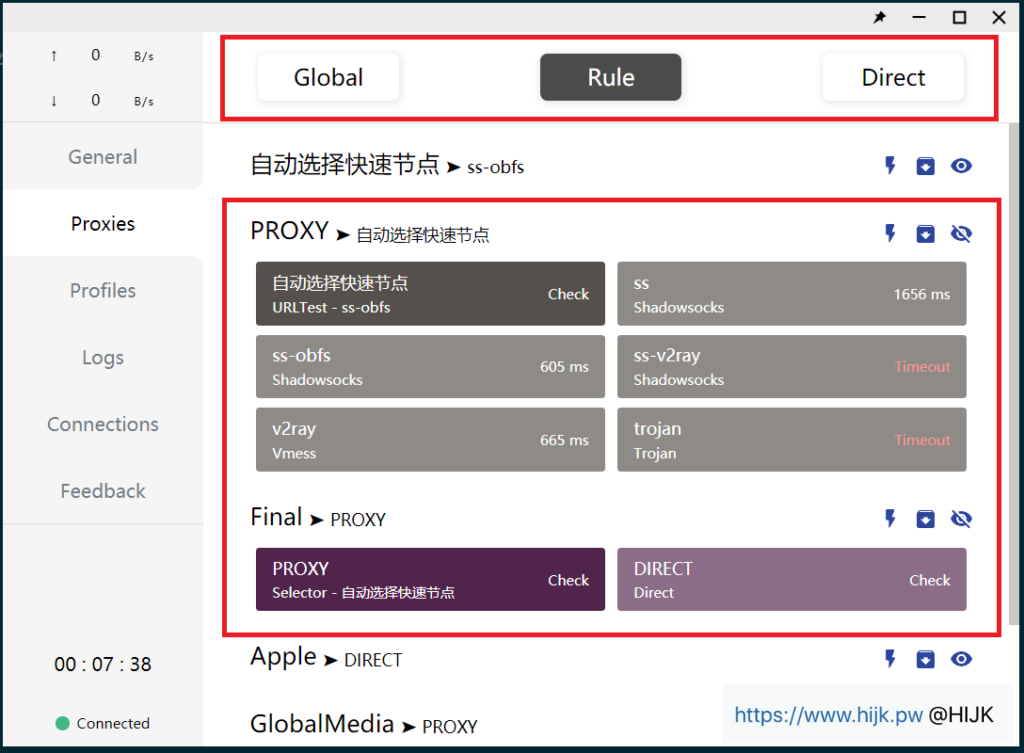
clash选择代理模式和节点
最上面的Global、Rule和Direct表示全局代理、基于规则路由和直连,(可以认为)对应其他客户端的全局模式、PAC模式和禁用系统代理。绝大多数情况建议使用Rule。
接着在PROXY里选择使用的节点,默认是自动选择快速节点,也可以指定使用某个节点。
Final表示如果没有匹配的规则,默认走代理还是直连。个人建议默认直连,网站打不开再选择代理。
其他看不懂的东西保持默认就好了。
Docker
We recommend deploying Clash with Docker Compose if you’re on Linux. On macOS, it’s recommended to use the third-party Clash GUI ClashX Pro. (#770)
1 | version: '3' |
Save as docker-compose.yaml, create config.yaml in the same directory, and run the below commands to get Clash up:
1 | $ docker-compose up -d |
You can view the logs with:
1 | $ docker-compose logs |
Stop Clash with:
1 | $ docker-compose stop && docker-compose rm -f |
Bazel 设置proxy
1 | export HTTP_PROXY=http://127.0.0.1:7890 |
Git 设置proxy
1 移除当前 Git 全局配置代理
1 | git config --global --unset http.proxy |
2 查看信息 Git 配置信息
1 | git config --global -l |
3 重新为 Git 设置代理
1 | git config --global http.proxy 'http://127.0.0.1:7895' |
4 再次查看 gitconfig 的配置
使用如下命令再次查看配置文件
1 | cat ~/.gitconfig |
会发现多出了这两行
1 | [http] |
Docker设置proxy
方法一、编辑~/.docker/config.json文件,加入proxies配置信息
1 | { |
方法二、Set the environment variables manually
When you build the image, or using the --env flag when you create or run the container, you can set one or more of the following variables to the appropriate value. This method makes the image less portable, so if you have Docker 17.07 or higher, you should configure the Docker client instead.
| Variable | Dockerfile example | docker run example |
|---|---|---|
HTTP_PROXY |
ENV HTTP_PROXY="http://127.0.0.1:7895" |
--env HTTP_PROXY="http://127.0.0.1:7895" |
HTTPS_PROXY |
ENV HTTPS_PROXY="127.0.0.1:7895" |
--env HTTPS_PROXY="https://127.0.0.1:7895" |
FTP_PROXY |
ENV FTP_PROXY="ftp://127.0.0.1:7895" |
--env FTP_PROXY="ftp://127.0.0.1:7895" |
NO_PROXY |
ENV NO_PROXY="*.test.example.com,.example2.com" |
--env NO_PROXY="*.test.example.com,.example2.com" |
1 | docker build . \ |